Saturday 31 December 2016

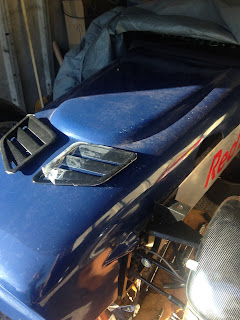
Bonnet vents part deux....

Apologies that the blog has been so quiet but with Xmas and freezing weather there's not been much opportunity to crack on. That said I managed to get a bit of spare time today and did a few minor jobs that I could quickly get out of the way.

I mentioned before that I had a plan to make the new bonnet vents flush. I removed the vents I bought after marking out the shape neatly in the bonnet....

I then smoothed off the edges which will eventually have some fibreglass resin/gel put on them to stop the edge deteriorating. The stainless mesh I bought will be sprayed satin black and bonded from underneath ....


Below you can see where this will vent and with the new polo rad going in there will no longer be any fouling from the Escorts rad cap.....


On the subject of the Polo rad I have made up some brackets from 3mm steel and given them a coat of Hammerite. I will write a more detailed post on the rad fitting as a complete article when I get round to that bit....


Wednesday 30 November 2016

Fitting an ATR sump from GBS

As the ATR sump is quite new to the market I thought I'd document my fitting quite well for those that may be Googling it as I was as I couldnt find any info....

The first thing I did was dry fit check alignment of all holes on the sump and oil pick up to make sure they perfectly match the engine block, which hooray they did. The reason for this is on engines made in different years there maybe adjustment needed machining and batches etc etc.

I then keyed the powder coat on the sump so the gasket sealant could bond better......


The kit comes with a cork gasket which needs to flex into and seal at the crank front and back. I decided to take some gasket seal (generously in these two areas) and run it in both curves and then using the sump bolts loosely hold the gasket at the edges whilst fitting the ends in place to the sump.

The pic above was a dry fit before adding the sealant but I then added the sealant and taking a graphics tube I had I put a torque wrench and breaker bar inside it for weight and let it sit on the sump for 10 minutes to get the shape adjusting where necessary....


Once this was done I ran the sealant down both sides and made sure it was all well placed and all holes lined up correctly. The pick up pipe comes with two 'o' rings one is a gasket and the larger one goes on the pick up in the sump to (I think) eliminate rattles.


I added a thin skimming of sealant and note you need to keep the bolts from the OEM pickup.
I then fitted it and put some threadlock on the bolts. They have a very low torque setting at 11 Nm so it should help against the rattles and bumps. Point to mention all the sump bolts that come from GBS/ATR have threadlock already.

So the sump is now fitted, advice from GBS (as they don't give you torque settings for the sump) was to fit accurately then 'nip up the bolts' Its quite old skool to say that but if you go mad you'll break the cork sump. Dont follow the standard Zetec OEM sump torque settings or you may damage the gasket. That said who knows if I have or haven't and only time will tell.


I hope this is of some help to someone if you're Googling the ATR sump fitting as I was!


Now for a couple of fancy pants shots of the car as it stands now.


Quite a transformation I think without the expense of a respray or new set of GRP as when I got it I thought 'the old skool blue has to go'


The main grill has been replaced again as the one I fitted was too thin and disappeared when on the car. Also I have a plan to make the vents flusher/out of sight along with Viper/GT stripes. I haven't put the vents on for look but for genuine function but know I can make them more subtle. All will be revealed in 'Bonnet Vents Part Deux'

Cheers!!


Tuesday 29 November 2016

Birthday Pressie - Dominators

Go these the other day, they look great. They're just loose at the moment as I want to modify the mounting brackets later. Much better than the huge chrome things previously fitted.....


Hope to get the new sump fitted this weekend and then get the new starter motor. Its really sol close to being roadworthy again and this time I have no IVA or registration to worry about and I have spent a fraction of what I spent on my Zero. All due to experience really. Once its back on the road and been given a few hundred miles of testing I'll then have a rethink on the colour scheme. There's something inside me now that wants to do it the same as my old Zero.

Friday 25 November 2016

Bonnet Vents

Zetecs or larger engines in Sevens need more air, they take up much more space and all the air gets hot. Having studied high and low pressure airflow areas over a 7's bonnet I went about cutting in some vents in one of the low pressure areas to let heat out. The fact they look great, racy and aggressive is a plus.


There's a high pressure area to the rear near the scuttle so Im working on ideas to get cold air in.....


Tomorrow it's time to put a new cam belt in, I've also bought an ATR shortened sump which is a big tick off the major bits I need to finish it. Also its my birthday on Sunday and Ive seen what look like Dominator headlamps arrive in the post 'for' the other half  :-)

But my much better half is away 'til Sunday, hence the lounge looks like this!


Ironically the DVD Im watching in the background is all about mk1 and mk2 Escorts as that's my dream project. Madly as youngsters we crashed them, slept in them, scrapped them and even worse I found out this week that my mate at work raffled his in a pub to get a train ticket home!! (£40 he got!!)  Back in the day and pre Sierra the Mk2 Escort was a big choice as kit car donor..... Doom! I have a Mk2 (finally) in kit car guise but with Sierra, Mondeo, Focus and other mods. Now that's evolution :-)


Saturday 5 November 2016

Seats, Wheels, Graphics

A little more progress, I got the seats last week. They're actually out of my Zero that I built a few years ago. The guy that bought it put grp ones in and so I got these back from him for £70 the pair!


Stripped the dash out to wire in the ECU, I was surprised as I was expecting it to be a right mess back here but its one job that has been done really well.


New rims looking good on 15's


Started playing around with the Red Bull concept, I have so many vinyls that I can afford to try a few different things out.


Thats all for now folks, its flipping cold work in the garage at the moment! I still need a shortened sump, starter and alternator kit so that I can actually get on with the business end of getting it started and back on the road. Theres no rush though as this was always a winter project, its just going very well! :-)


Thursday 13 October 2016

Loom Wiring

I made a brief start on this tonight, usin the loom from the Mondeo there is a lot to get rid of. Using guides from a couple of great guys on the LCB forum I managed to get it to this stage. The boot of my 3 series is now full of the stuff I cut out! The guide from Warren aka Big Wasa is awesome and has helped loads!


Pretty much done with the stripping out and now to look at what needs shortening and what needs extending


Fuel Pumps and Pipes. Zetec Throttlebody mod

Well after many design manoeuvres the LP and HP pumps are in (loose fitted). The swirlpot is in and the plumbing is routed (VERY loosely). I need to get a load of pipe clamps and p clips to secure all the piping and keep it out of harms way. Im really pleased I found room at the back to mount all this stuff. I think I'll give the diff a brush up and some Hammerite treatment.


I have modified the standard throttle body so it has an idle control screw as I wont be running an IACV as its really not necessary. All you have to do is remove the glue and then remove the grub screw that holds the throttle flap and then insert a suitable length bolt of the right thread. (the stainless flathead in my pic)